
안녕하세요, HELLO
오늘은 DeepLearning.AI에서 진행하는 앤드류 응(Andrew Ng) 교수님의 딥러닝 전문화의 마지막이며, 다섯 번째 과정인 "Sequence Models"을 정리하려고 합니다.
"Sequence Models"의 강의를 통해 '시퀀스 모델과 음성 인식, 음악 합성, 챗봇, 기계 번역, 자연어 처리(NLP)' 등을 이해하고, 순환 신경망(RNN)과 GRU 및 LSTM, 트랜스포머 모델에 대해서 배우게 됩니다. 강의는 아래와 같이 구성되어 있습니다.
~ Recurrent Neural Networks
~ Natural Language Processing & Word Embeddings
~ Sequence Models & Attention Mechanism
~ Transformer Network
"Sequence Models" (Andrew Ng)의 3주차 "Neural Machine Translation"의 실습 내용입니다.
CHAPTER 1. 'Packages'
CHAPTER 2. 'Translating Human Readable Dates Into Machine Readable Dates'
CHAPTER 3. 'Neural Machine Translation with Attention'
CHAPTER 4. 'Visualizing Attention (Optional / Ungraded)'
CHAPTER 1. 'Packages'
from tensorflow.keras.layers import Bidirectional, Concatenate, Permute, Dot, Input, LSTM, Multiply
from tensorflow.keras.layers import RepeatVector, Dense, Activation, Lambda
from tensorflow.keras.optimizers import Adam
from tensorflow.keras.utils import to_categorical
from tensorflow.keras.models import load_model, Model
import tensorflow.keras.backend as K
import tensorflow as tf
import numpy as np

from faker import Faker
import random
from tqdm import tqdm
from babel.dates import format_date
from nmt_utils import *
import matplotlib.pyplot as plt
%matplotlib inline
CHAPTER 2. 'Translating Human Readable Dates Into Machine Readable Dates'
- The model you will build here could be used to translate from one language to another, such as translating from English to Hindi.
- However, language translation requires massive datasets and usually takes days of training on GPUs.
- To give you a place to experiment with these models without using massive datasets, we will perform a simpler "date translation" task.
- The network will input a date written in a variety of possible formats (e.g. "the 29th of August 1958", "03/30/1968", "24 JUNE 1987")
- The network will translate them into standardized, machine readable dates (e.g. "1958-08-29", "1968-03-30", "1987-06-24").
- We will have the network learn to output dates in the common machine-readable format YYYY-MM-DD.
□ Dataset
We will train the model on a dataset of 10,000 human readable dates and their equivalent, standardized, machine readable dates. Let's run the following cells to load the dataset and print some examples.
m = 10000
dataset, human_vocab, machine_vocab, inv_machine_vocab = load_dataset(m)
dataset[:10]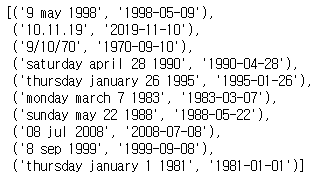
You've loaded:
- dataset: a list of tuples of (human readable date, machine readable date).
- human_vocab: a python dictionary mapping all characters used in the human readable dates to an integer-valued index.
- machine_vocab: a python dictionary mapping all characters used in machine readable dates to an integer-valued index.
- Note: These indices are not necessarily consistent with human_vocab.
- inv_machine_vocab: the inverse dictionary of machine_vocab, mapping from indices back to characters.
Let's preprocess the data and map the raw text data into the index values.
- We will set Tx=30
- We assume Tx is the maximum length of the human readable date.
- If we get a longer input, we would have to truncate it.
- We will set Ty=10
- "YYYY-MM-DD" is 10 characters long.
Tx = 30
Ty = 10
X, Y, Xoh, Yoh = preprocess_data(dataset, human_vocab, machine_vocab, Tx, Ty)

print("X.shape:", X.shape)
print("Y.shape:", Y.shape)
print("Xoh.shape:", Xoh.shape)
print("Yoh.shape:", Yoh.shape)
index = 0
print("Source date:", dataset[index][0])
print("Target date:", dataset[index][1])
print()
print("Source after preprocessing (indices):", X[index])
print("Target after preprocessing (indices):", Y[index])
print()
print("Source after preprocessing (one-hot):", Xoh[index])
print("Target after preprocessing (one-hot):", Yoh[index])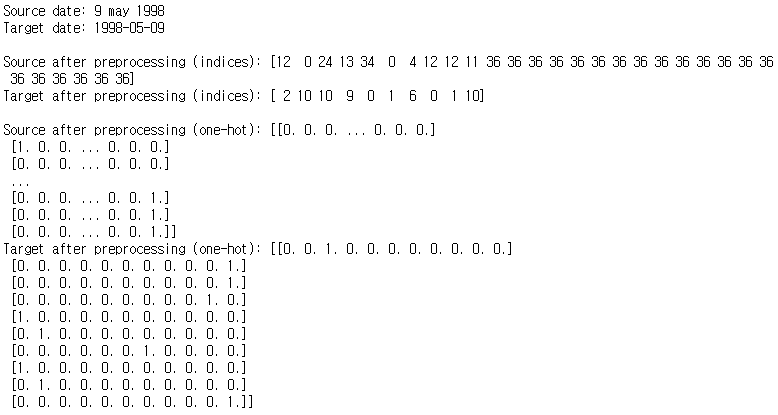
CHAPTER 3. 'Neural Machine Translation with Attention'
- If you had to translate a book's paragraph from French to English, you would not read the whole paragraph, then close the book and translate.
- Even during the translation process, you would read/re-read and focus on the parts of the French paragraph corresponding to the parts of the English you are writing down.
- The attention mechanism tells a Neural Machine Translation model where it should pay attention to at any step.
□ Attention Mechanism

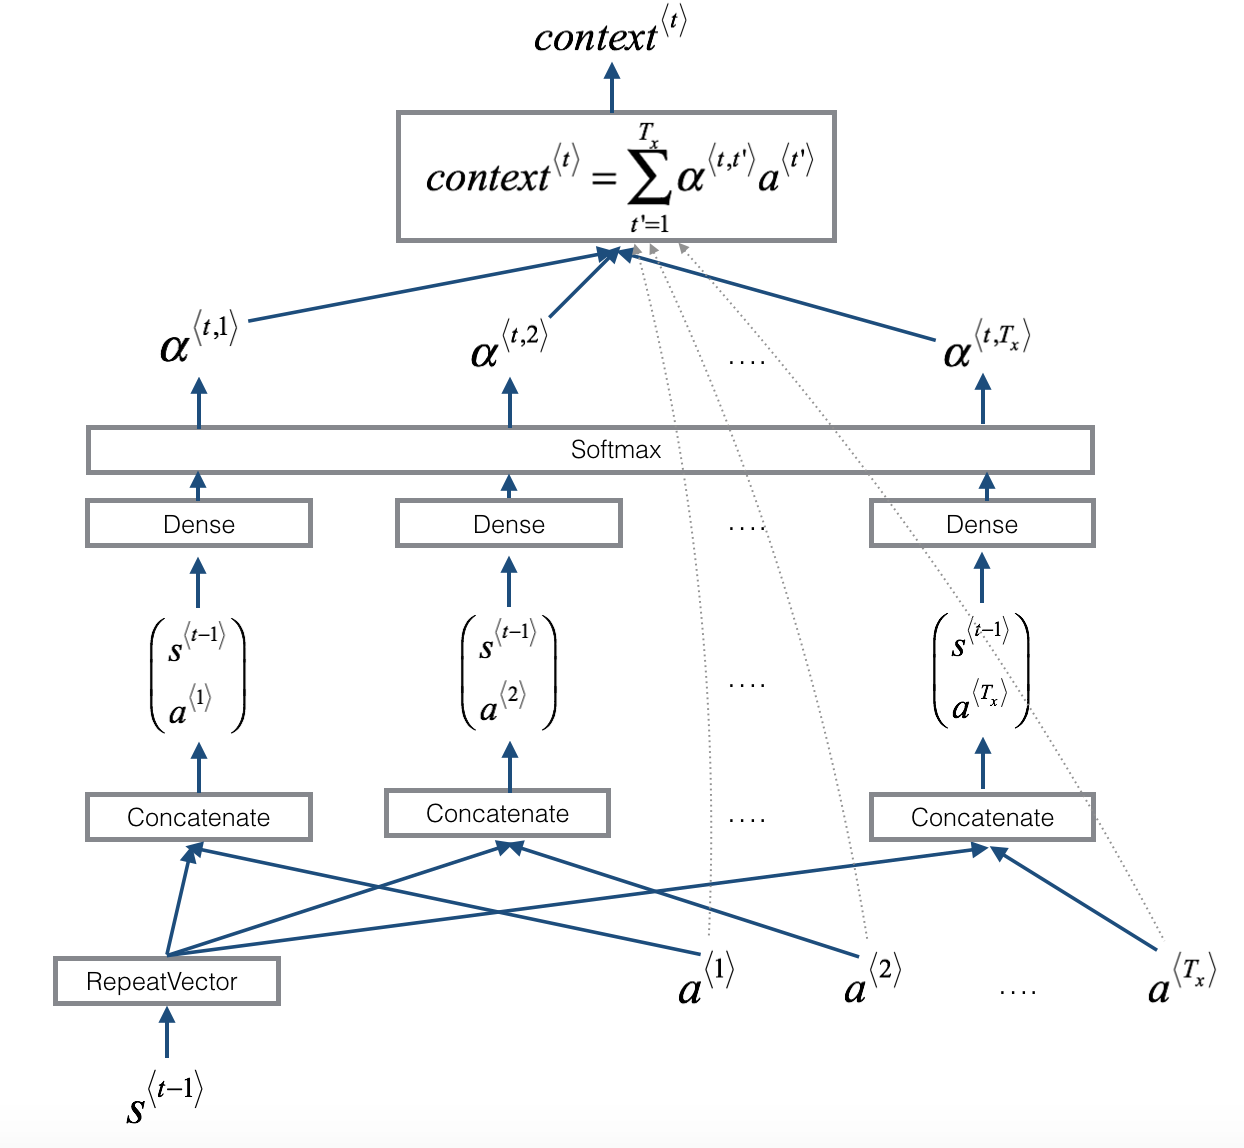
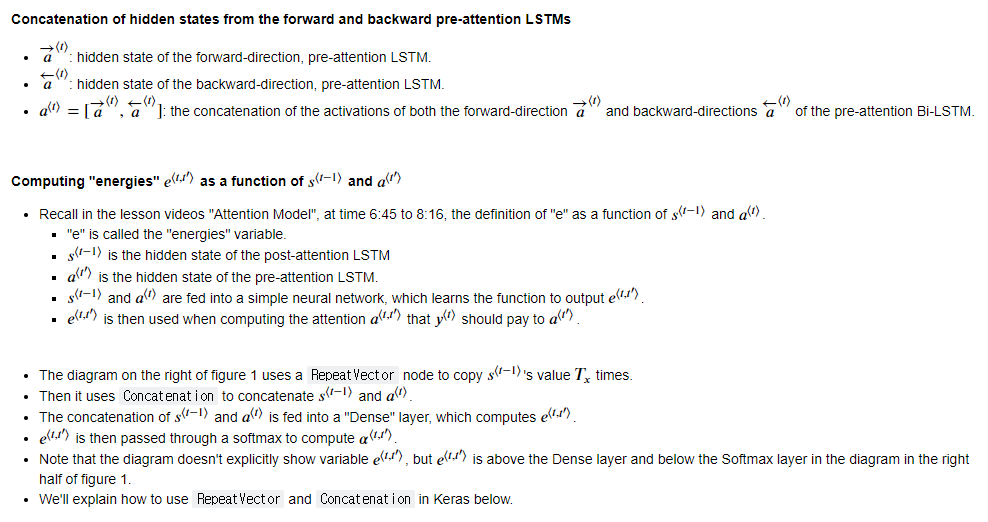
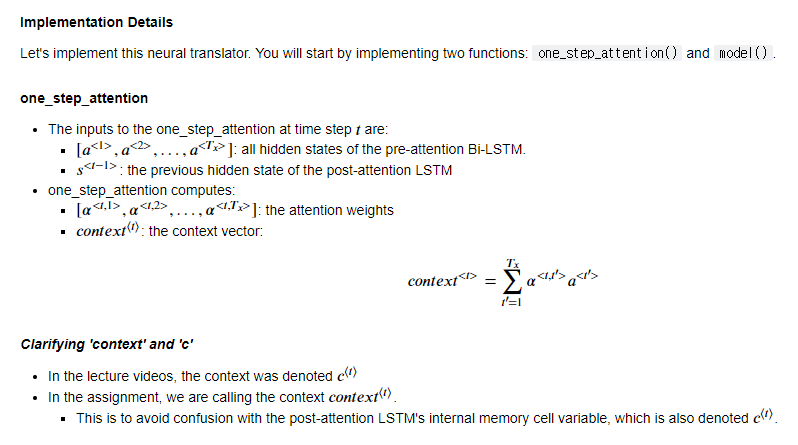
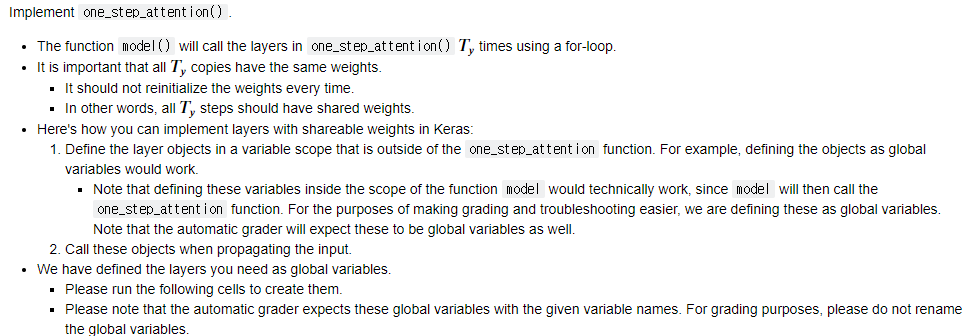
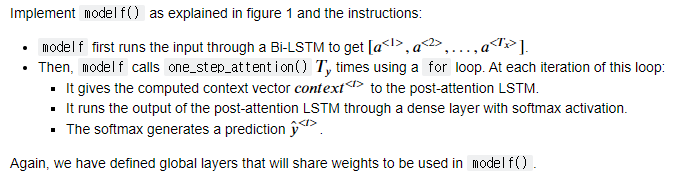
□ one_step_attention
# Defined shared layers as global variables
repeator = RepeatVector(Tx)
concatenator = Concatenate(axis=-1)
densor1 = Dense(10, activation = "tanh")
densor2 = Dense(1, activation = "relu")
activator = Activation(softmax, name='attention_weights') # We are using a custom softmax(axis = 1) loaded in this notebook
dotor = Dot(axes = 1)
# UNQ_C1 (UNIQUE CELL IDENTIFIER, DO NOT EDIT)
# GRADED FUNCTION: one_step_attention

def one_step_attention(a, s_prev):
    """
    Performs one step of attention: Outputs a context vector computed as a dot product of the attention weights
    "alphas" and the hidden states "a" of the Bi-LSTM.

    Arguments:
    a -- hidden state output of the Bi-LSTM, numpy-array of shape (m, Tx, 2*n_a)
    s_prev -- previous hidden state of the (post-attention) LSTM, numpy-array of shape (m, n_s)

    Returns:
    context -- context vector, input of the next (post-attention) LSTM cell
    """

    ### START CODE HERE ###
    # Use repeator to repeat s_prev to be of shape (m, Tx, n_s) so that you can concatenate it with all hidden states "a" (≈ 1 line)
    s_prev = repeator(s_prev)
    # Use concatenator to concatenate a and s_prev on the last axis (≈ 1 line)
    # For grading purposes, please list 'a' first and 's_prev' second, in this order.
    concat = concatenator([a,s_prev])
    # Use densor1 to propagate concat through a small fully-connected neural network to compute the "intermediate energies" variable e. (≈1 lines)
    e = densor1(concat)
    # Use densor2 to propagate e through a small fully-connected neural network to compute the "energies" variable energies. (≈1 lines)
    energies = densor2(e)
    # Use "activator" on "energies" to compute the attention weights "alphas" (≈ 1 line)
    alphas = activator(energies)
    # Use dotor together with "alphas" and "a", in this order, to compute the context vector to be given to the next (post-attention) LSTM-cell (≈ 1 line)
    context = dotor([alphas, a])
    ### END CODE HERE ###

    return context
# UNIT TEST
def one_step_attention_test(target):
m = 10
Tx = 30
n_a = 32
n_s = 64
#np.random.seed(10)
a = np.random.uniform(1, 0, (m, Tx, 2 * n_a)).astype(np.float32)
s_prev =np.random.uniform(1, 0, (m, n_s)).astype(np.float32) * 1
context = target(a, s_prev)
assert type(context) == tf.python.framework.ops.EagerTensor, "Unexpected type. It should be a Tensor"
assert tuple(context.shape) == (m, 1, n_s), "Unexpected output shape"
assert np.all(context.numpy() > 0), "All output values must be > 0 in this example"
assert np.all(context.numpy() < 1), "All output values must be < 1 in this example"
#assert np.allclose(context[0][0][0:5].numpy(), [0.50877404, 0.57160693, 0.45448175, 0.50074816, 0.53651875]), "Unexpected values in the result"
print("\033[92mAll tests passed!")
one_step_attention_test(one_step_attention)□ modelf
n_a = 32 # number of units for the pre-attention, bi-directional LSTM's hidden state 'a'
n_s = 64 # number of units for the post-attention LSTM's hidden state "s"

# Please note, this is the post attention LSTM cell.
post_activation_LSTM_cell = LSTM(n_s, return_state = True) # Please do not modify this global variable.
output_layer = Dense(len(machine_vocab), activation=softmax)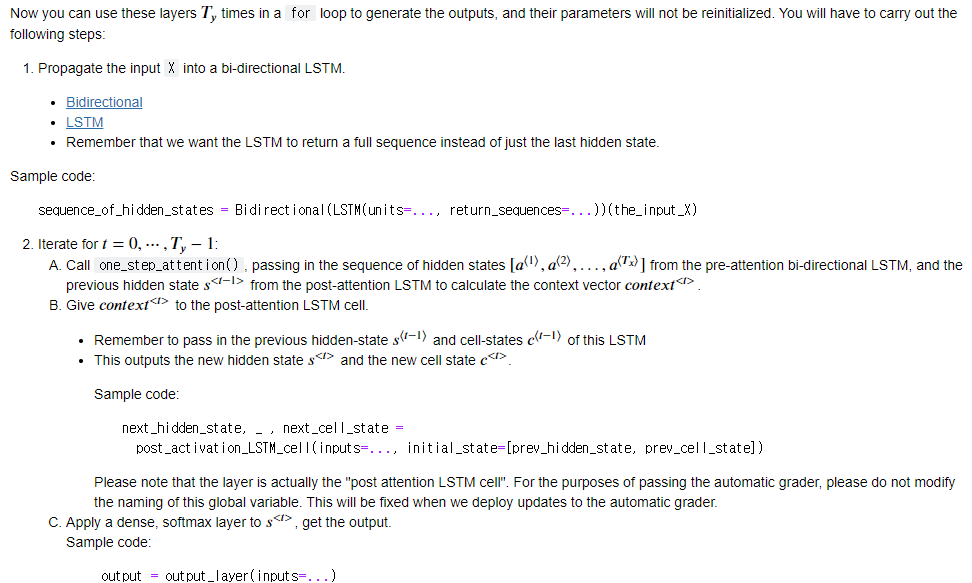
# UNQ_C2 (UNIQUE CELL IDENTIFIER, DO NOT EDIT)
# GRADED FUNCTION: model

def modelf(Tx, Ty, n_a, n_s, human_vocab_size, machine_vocab_size):
    """
    Arguments:
    Tx -- length of the input sequence
    Ty -- length of the output sequence
    n_a -- hidden state size of the Bi-LSTM
    n_s -- hidden state size of the post-attention LSTM
    human_vocab_size -- size of the python dictionary "human_vocab"
    machine_vocab_size -- size of the python dictionary "machine_vocab"

    Returns:
    model -- Keras model instance
    """

    # Define the inputs of your model with a shape (Tx,)
    # Define s0 (initial hidden state) and c0 (initial cell state)
    # for the decoder LSTM with shape (n_s,)
    X = Input(shape=(Tx, human_vocab_size))
    s0 = Input(shape=(n_s,), name='s0')
    c0 = Input(shape=(n_s,), name='c0')
    s = s0
    c = c0

    # Initialize empty list of outputs
    outputs = []

    ### START CODE HERE ###

    # Step 1: Define your pre-attention Bi-LSTM. (≈ 1 line)
    a = Bidirectional(LSTM(n_a, return_sequences = True))(X)

    # Step 2: Iterate for Ty steps
    for t in range(Ty):

        # Step 2.A: Perform one step of the attention mechanism to get back the context vector at step t (≈ 1 line)
        context = one_step_attention(a, s)

        # Step 2.B: Apply the post-attention LSTM cell to the "context" vector.
        # Don't forget to pass: initial_state = [hidden state, cell state] (≈ 1 line)
        s, _, c = post_activation_LSTM_cell(inputs = context, initial_state=[s, c])

        # Step 2.C: Apply Dense layer to the hidden state output of the post-attention LSTM (≈ 1 line)
        out = output_layer(inputs = s)

        # Step 2.D: Append "out" to the "outputs" list (≈ 1 line)
        outputs.append(out)

    # Step 3: Create model instance taking three inputs and returning the list of outputs. (≈ 1 line)
    model = Model([X, s0, c0], outputs)

    ### END CODE HERE ###

    return model
# UNIT TEST
from test_utils import *
def modelf_test(target):
m = 10
Tx = 30
n_a = 32
n_s = 64
len_human_vocab = 37
len_machine_vocab = 11
model = target(Tx, Ty, n_a, n_s, len_human_vocab, len_machine_vocab)
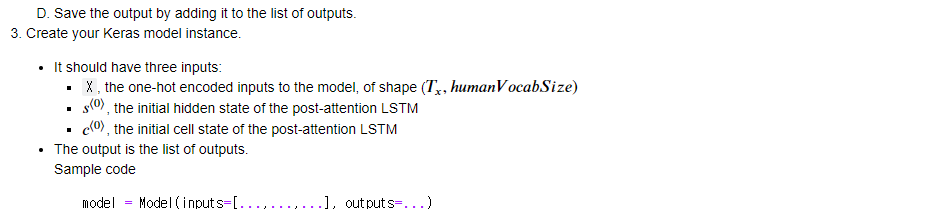
print(summary(model))
expected_summary = [['InputLayer', [(None, 30, 37)], 0],
['InputLayer', [(None, 64)], 0],
['Bidirectional', (None, 30, 64), 17920],
['RepeatVector', (None, 30, 64), 0, 30],
['Concatenate', (None, 30, 128), 0],
['Dense', (None, 30, 10), 1290, 'tanh'],
['Dense', (None, 30, 1), 11, 'relu'],
['Activation', (None, 30, 1), 0],
['Dot', (None, 1, 64), 0],
['InputLayer', [(None, 64)], 0],
['LSTM',[(None, 64), (None, 64), (None, 64)], 33024,[(None, 1, 64), (None, 64), (None, 64)],'tanh'],
['Dense', (None, 11), 715, 'softmax']]
assert len(model.outputs) == 10, f"Wrong output shape. Expected 10 != {len(model.outputs)}"
comparator(summary(model), expected_summary)
modelf_test(modelf)
model = modelf(Tx, Ty, n_a, n_s, len(human_vocab), len(machine_vocab))
model.summary()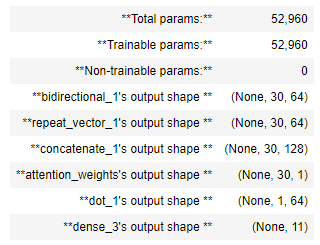
Troubleshooting Note
- If you are getting repeated errors after an initially incorrect implementation of "model", but believe that you have corrected the error, you may still see error messages when building your model.
- A solution is to save and restart your kernel (or shutdown then restart your notebook), and re-run the cells.
□ Compile the Model
### START CODE HERE ### (≈2 lines)
opt = Adam(learning_rate=0.005, beta_1 = 0.9, beta_2=0.999, decay=0.01) # Adam(...)
model.compile(loss = "categorical_crossentropy", optimizer = opt, metrics = ['accuracy'])
### END CODE HERE ###
# UNIT TESTS
assert opt.lr == 0.005, "Set the lr parameter to 0.005"
assert opt.beta_1 == 0.9, "Set the beta_1 parameter to 0.9"
assert opt.beta_2 == 0.999, "Set the beta_2 parameter to 0.999"
assert opt.decay == 0.01, "Set the decay parameter to 0.01"
assert model.loss == "categorical_crossentropy", "Wrong loss. Use 'categorical_crossentropy'"
assert model.optimizer == opt, "Use the optimizer that you have instantiated"
assert model.compiled_metrics._user_metrics[0] == 'accuracy', "set metrics to ['accuracy']"

print("\033[92mAll tests passed!")
s0 = np.zeros((m, n_s))
c0 = np.zeros((m, n_s))
outputs = list(Yoh.swapaxes(0,1))

model.fit([Xoh, s0, c0], outputs, epochs=1, batch_size=100)
CHAPTER 4. 'Visualizing Attention (Optional / Ungraded)'
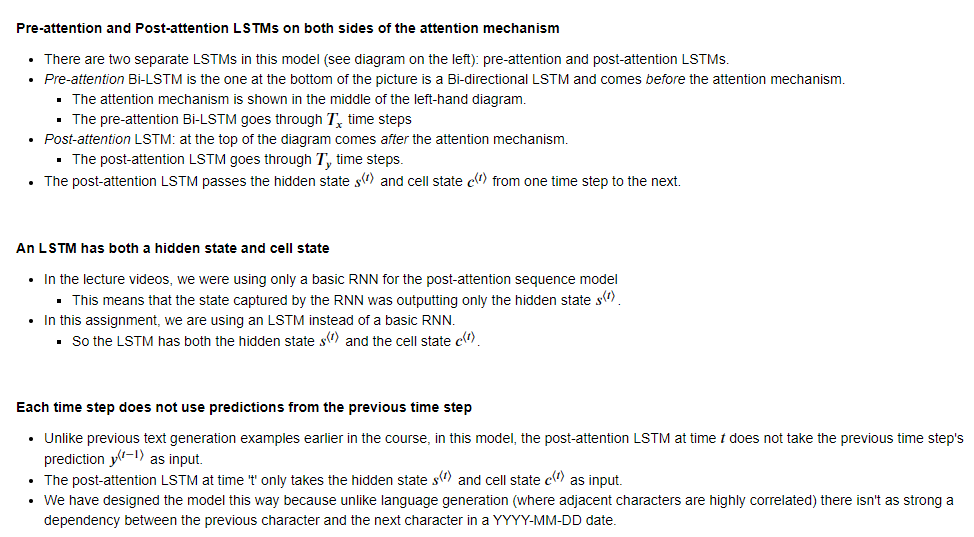
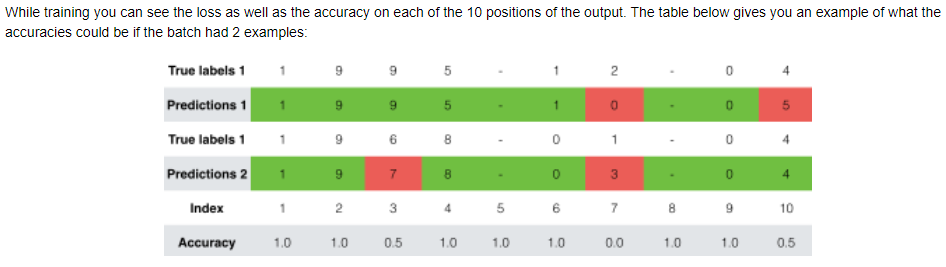
Since the problem has a fixed output length of 10, it is also possible to carry out this task using 10 different softmax units to generate the 10 characters of the output. But one advantage of the attention model is that each part of the output (such as the month) knows it needs to depend only on a small part of the input (the characters in the input giving the month). We can visualize what each part of the output is looking at which part of the input.
Consider the task of translating "Saturday 9 May 2018" to "2018-05-09". If we visualize the computed 𝛼⟨𝑡,𝑡′⟩ we get this:
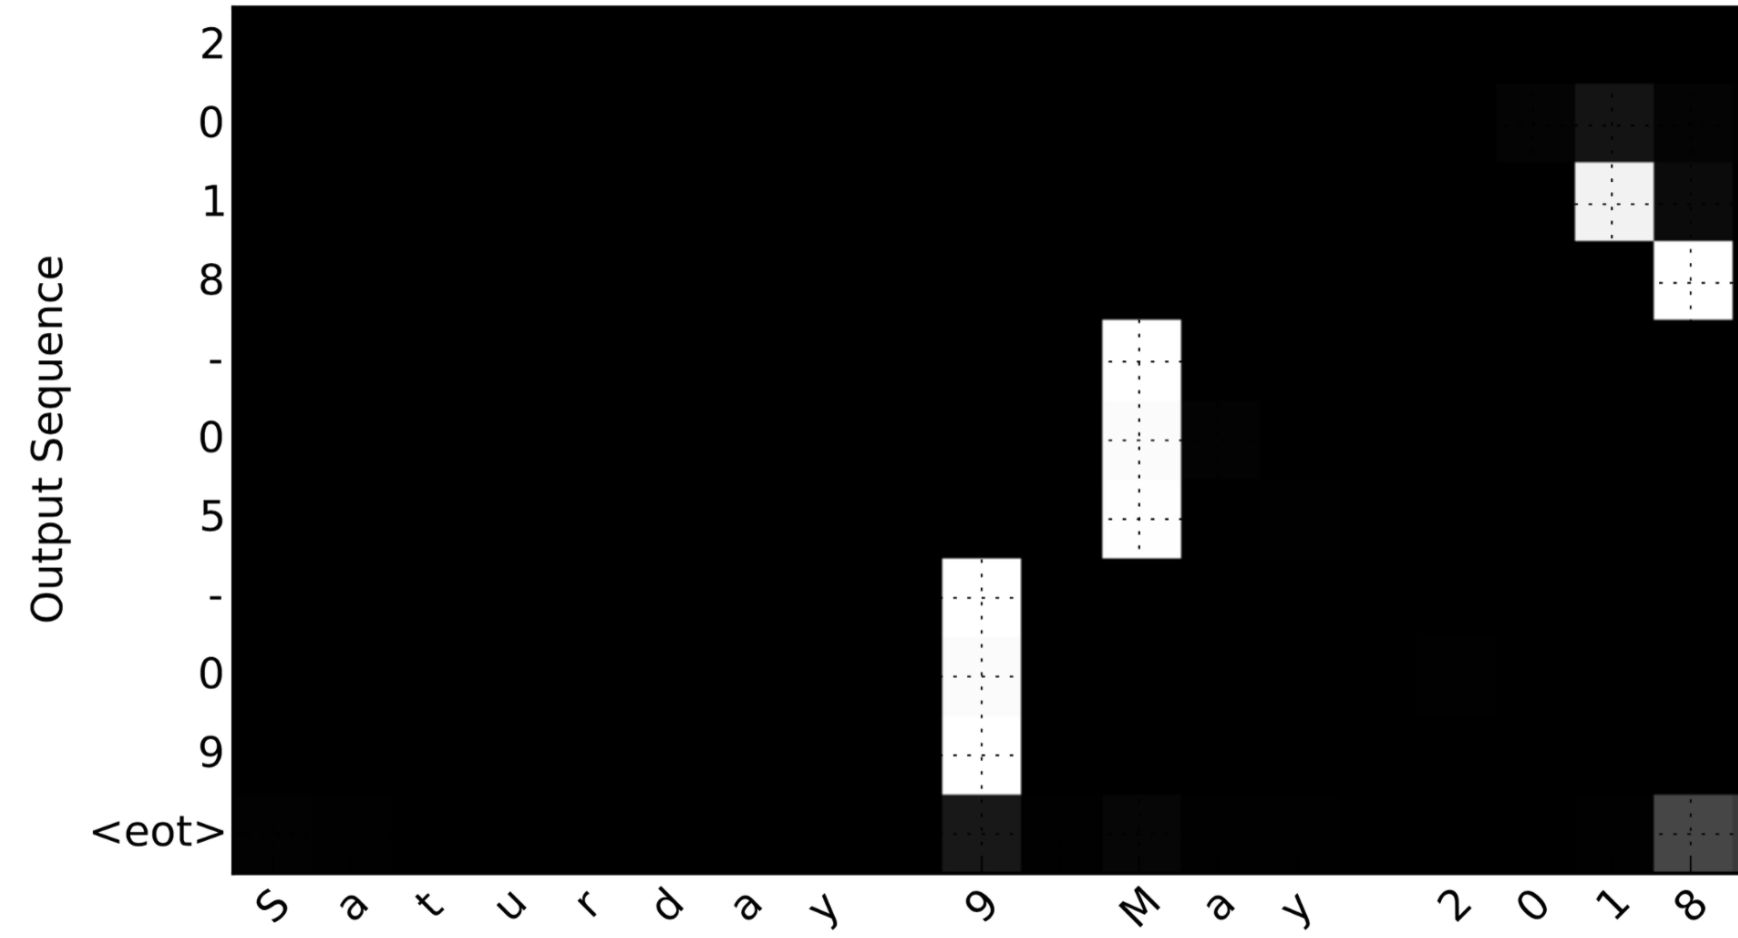
Notice how the output ignores the "Saturday" portion of the input. None of the output timesteps are paying much attention to that portion of the input. We also see that 9 has been translated as 09 and May has been correctly translated into 05, with the output paying attention to the parts of the input it needs to to make the translation. The year mostly requires it to pay attention to the input's "18" in order to generate "2018."
□ Getting the Attention Weights From the Network
attention_map = plot_attention_map(model, human_vocab, inv_machine_vocab, "Tuesday 09 Oct 1993", num = 7, n_s = 64);
On the generated plot you can observe the values of the attention weights for each character of the predicted output. Examine this plot and check that the places where the network is paying attention makes sense to you.
In the date translation application, you will observe that most of the time attention helps predict the year, and doesn't have much impact on predicting the day or month.
Here's what you should remember
- Machine translation models can be used to map from one sequence to another. They are useful not just for translating human languages (like French->English) but also for tasks like date format translation.
- An attention mechanism allows a network to focus on the most relevant parts of the input when producing a specific part of the output.
- A network using an attention mechanism can translate from inputs of length 𝑇𝑥Tx to outputs of length 𝑇𝑦Ty, where 𝑇𝑥Tx and 𝑇𝑦Ty can be different.
- You can visualize attention weights 𝛼⟨𝑡,𝑡′⟩α⟨t,t′⟩ to see what the network is paying attention to while generating each output.
■ 마무리
"Sequence Models" (Andrew Ng)의 3주차 "Neural Machine Translation"의 실습에 대해서 정리해봤습니다.
그럼 오늘 하루도 즐거운 나날 되길 기도하겠습니다
좋아요와 댓글 부탁드립니다 :)
감사합니다.
'COURSERA' 카테고리의 다른 글
| week 4_Transformer Network (Andrew Ng) (0) | 2022.05.17 |
|---|---|
| week 3_Trigger Word Detection 실습 (Andrew Ng) (0) | 2022.05.17 |
| week 3_Sequence Models & Attention Mechanism 연습 문제 (Andrew Ng) (0) | 2022.05.17 |
| week 3_Sequence Models & Attention Mechanism (Andrew Ng) (1) | 2022.05.10 |
| week 2_Emoji_v3a 실습 (Andrew Ng) (0) | 2022.04.27 |


댓글