
안녕하세요, HELLO
오늘은 DeepLearning.AI에서 진행하는 앤드류 응(Andrew Ng) 교수님의 딥러닝 전문화의 네 번째 과정인 "Convolutional Neural Networks"을 정리하려고 합니다.
"Convolutional Neural Networks"의 강의를 통해 '자율 주행, 얼굴 인식, 방사선 이미지 인식' 등을 이해하고, CNN 모델에 대해서 배우게 됩니다. 강의는 아래와 같이 구성되어 있습니다.
~ Foundations of Convolutional Neural Networks
~ Deep Convolutional Models: Case Studies
~ Object Detection
~ Special Applications: Face recognition & Neural Style Transfer
"Convolutional Neural Networks" (Andrew Ng)의 2주차 "Residual Networks" 실습 내용입니다.
By the end of this assignment, you'll be able to:
- Implement the basic building blocks of ResNets in a deep neural network using Keras
- Put together these building blocks to implement and train a state-of-the-art neural network for image classification
- Implement a skip connection in your network
CHAPTER 1. 'Packages'
CHAPTER 2. 'The Problem of Very Deep Neural Networks'
CHAPTER 3. 'Building a Residual Network'
CHAPTER 4. 'Building Your First ResNet Model (50 layers)'
CHAPTER 1. 'Packages'
import tensorflow as tf
import numpy as np
import scipy.misc
from tensorflow.keras.applications.resnet_v2 import ResNet50V2
from tensorflow.keras.preprocessing import image
from tensorflow.keras.applications.resnet_v2 import preprocess_input, decode_predictions
from tensorflow.keras import layers
from tensorflow.keras.layers import Input, Add, Dense, Activation, ZeroPadding2D, BatchNormalization, Flatten, Conv2D, AveragePooling2D, MaxPooling2D, GlobalMaxPooling2D
from tensorflow.keras.models import Model, load_model
from resnets_utils import *
from tensorflow.keras.initializers import random_uniform, glorot_uniform, constant, identity
from tensorflow.python.framework.ops import EagerTensor
from matplotlib.pyplot import imshow

from test_utils import summary, comparator
import public_tests

%matplotlib inline
CHAPTER 2. 'The Problem of Very Deep Neural Networks'
- The main benefit of a very deep network is that it can represent very complex functions. It can also learn features at many different levels of abstraction, from edges (at the shallower layers, closer to the input) to very complex features (at the deeper layers, closer to the output).
- However, using a deeper network doesn't always help. A huge barrier to training them is vanishing gradients: very deep networks often have a gradient signal that goes to zero quickly, thus making gradient descent prohibitively slow.
- More specifically, during gradient descent, as you backpropagate from the final layer back to the first layer, you are multiplying by the weight matrix on each step, and thus the gradient can decrease exponentially quickly to zero (or, in rare cases, grow exponentially quickly and "explode," from gaining very large values).
- During training, you might therefore see the magnitude (or norm) of the gradient for the shallower layers decrease to zero very rapidly as training proceeds, as shown below:

CHAPTER 3. 'Building a Residual Network'
In ResNets, a "shortcut" or a "skip connection" allows the model to skip layers:

The image on the left shows the "main path" through the network. The image on the right adds a shortcut to the main path. By stacking these ResNet blocks on top of each other, you can form a very deep network.
The lecture mentioned that having ResNet blocks with the shortcut also makes it very easy for one of the blocks to learn an identity function. This means that you can stack on additional ResNet blocks with little risk of harming training set performance.
On that note, there is also some evidence that the ease of learning an identity function accounts for ResNets' remarkable performance even more than skip connections help with vanishing gradients.
Two main types of blocks are used in a ResNet, depending mainly on whether the input/output dimensions are the same or different. You are going to implement both of them: the "identity block" and the "convolutional block."
□ The Identity Block
The identity block is the standard block used in ResNets, and corresponds to the case where the input activation (say 𝑎[𝑙] ) has the same dimension as the output activation (say 𝑎[𝑙+2] ). To flesh out the different steps of what happens in a ResNet's identity block, here is an alternative diagram showing the individual steps:

The upper path is the "shortcut path." The lower path is the "main path." In this diagram, notice the CONV2D and ReLU steps in each layer. To speed up training, a BatchNorm step has been added. Don't worry about this being complicated to implement--you'll see that BatchNorm is just one line of code in Keras!
In this exercise, you'll actually implement a slightly more powerful version of this identity block, in which the skip connection "skips over" 3 hidden layers rather than 2 layers. It looks like this:


■ identity_block
# UNQ_C1
# GRADED FUNCTION: identity_block

def identity_block(X, f, filters, training=True, initializer=random_uniform):
    """
    Implementation of the identity block as defined in Figure 4

    Arguments:
    X -- input tensor of shape (m, n_H_prev, n_W_prev, n_C_prev)
    f -- integer, specifying the shape of the middle CONV's window for the main path
    filters -- python list of integers, defining the number of filters in the CONV layers of the main path
    training -- True: Behave in training mode
                False: Behave in inference mode
    initializer -- to set up the initial weights of a layer. Equals to random uniform initializer

    Returns:
    X -- output of the identity block, tensor of shape (m, n_H, n_W, n_C)
    """

    # Retrieve Filters
    F1, F2, F3 = filters

    # Save the input value. You'll need this later to add back to the main path.
    X_shortcut = X

    # First component of main path
    X = Conv2D(filters = F1, kernel_size = 1, strides = (1,1), padding = 'valid', kernel_initializer = initializer(seed=0))(X)
    X = BatchNormalization(axis = 3)(X, training = training) # Default axis
    X = Activation('relu')(X)

    ### START CODE HERE
    ## Second component of main path (≈3 lines)
    X = Conv2D(filters = F2, kernel_size = f, strides = (1,1), padding = 'same', kernel_initializer = initializer(seed=0))(X)
    X = BatchNormalization(axis = 3)(X, training = training) # Default axis
    X = Activation('relu')(X)

    ## Third component of main path (≈2 lines)
    X = Conv2D(filters = F3, kernel_size = 1, strides = (1,1), padding = 'valid', kernel_initializer = initializer(seed=0))(X)
    X = BatchNormalization(axis = 3)(X, training = training) # Default axis

    ## Final step: Add shortcut value to main path, and pass it through a RELU activation (≈2 lines)
    X = tf.keras.layers.Add()([X, X_shortcut])
    X = Activation('relu')(X)
    ### END CODE HERE

    return X
np.random.seed(1)
X1 = np.ones((1, 4, 4, 3)) * -1
X2 = np.ones((1, 4, 4, 3)) * 1
X3 = np.ones((1, 4, 4, 3)) * 3

X = np.concatenate((X1, X2, X3), axis = 0).astype(np.float32)

A3 = identity_block(X, f=2, filters=[4, 4, 3],
                   initializer=lambda seed=0:constant(value=1),
                   training=False)
print('\033[1mWith training=False\033[0m\n')
A3np = A3.numpy()
print(np.around(A3.numpy()[:,(0,-1),:,:].mean(axis = 3), 5))
resume = A3np[:,(0,-1),:,:].mean(axis = 3)
print(resume[1, 1, 0])

print('\n\033[1mWith training=True\033[0m\n')
np.random.seed(1)
A4 = identity_block(X, f=2, filters=[3, 3, 3],
                   initializer=lambda seed=0:constant(value=1),
                   training=True)
print(np.around(A4.numpy()[:,(0,-1),:,:].mean(axis = 3), 5))

public_tests.identity_block_test(identity_block)
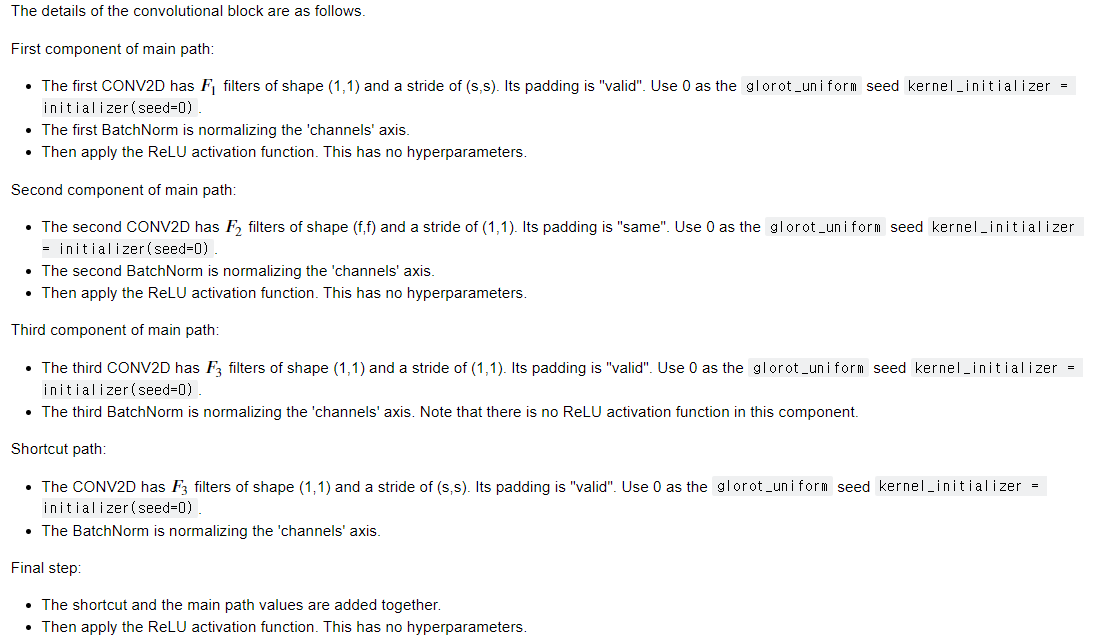
□ The Convolutional Block
The ResNet "convolutional block" is the second block type. You can use this type of block when the input and output dimensions don't match up. The difference with the identity block is that there is a CONV2D layer in the shortcut path:

- The CONV2D layer in the shortcut path is used to resize the input 𝑥 to a different dimension, so that the dimensions match up in the final addition needed to add the shortcut value back to the main path. (This plays a similar role as the matrix 𝑊𝑠 discussed in lecture.)
- For example, to reduce the activation dimensions's height and width by a factor of 2, you can use a 1x1 convolution with a stride of 2.
- The CONV2D layer on the shortcut path does not use any non-linear activation function. Its main role is to just apply a (learned) linear function that reduces the dimension of the input, so that the dimensions match up for the later addition step.
- As for the previous exercise, the additional initializer argument is required for grading purposes, and it has been set by default to glorot_uniform
■ convolutional_block
# UNQ_C2
# GRADED FUNCTION: convolutional_block

def convolutional_block(X, f, filters, s = 2, training=True, initializer=glorot_uniform):
    """
    Implementation of the convolutional block as defined in Figure 4

    Arguments:
    X -- input tensor of shape (m, n_H_prev, n_W_prev, n_C_prev)
    f -- integer, specifying the shape of the middle CONV's window for the main path
    filters -- python list of integers, defining the number of filters in the CONV layers of the main path
    s -- Integer, specifying the stride to be used
    training -- True: Behave in training mode
                False: Behave in inference mode
    initializer -- to set up the initial weights of a layer. Equals to Glorot uniform initializer,
                   also called Xavier uniform initializer.

    Returns:
    X -- output of the convolutional block, tensor of shape (n_H, n_W, n_C)
    """

    # Retrieve Filters
    F1, F2, F3 = filters

    # Save the input value
    X_shortcut = X


    ##### MAIN PATH #####

    # First component of main path glorot_uniform(seed=0)
    X = Conv2D(filters = F1, kernel_size = 1, strides = (s, s), padding='valid', kernel_initializer = initializer(seed=0))(X)
    X = BatchNormalization(axis = 3)(X, training=training)
    X = Activation('relu')(X)

    ### START CODE HERE

    ## Second component of main path (≈3 lines)
    X = Conv2D(filters = F2, kernel_size = f, strides = (1, 1), padding='same', kernel_initializer = initializer(seed=0))(X)
    X = BatchNormalization(axis = 3)(X, training=training)
    X = Activation('relu')(X)

    ## Third component of main path (≈2 lines)
    X = Conv2D(filters = F3, kernel_size = 1, strides = (1, 1), padding='valid', kernel_initializer = initializer(seed=0))(X)
    X = BatchNormalization(axis = 3)(X, training=training)

    ##### SHORTCUT PATH ##### (≈2 lines)
    X_shortcut = Conv2D(filters = F3, kernel_size = 1, strides = (s, s), padding='valid', kernel_initializer = initializer(seed=0))(X_shortcut)
    X_shortcut = BatchNormalization(axis = 3)(X_shortcut, training=training)

    ### END CODE HERE

    # Final step: Add shortcut value to main path (Use this order [X, X_shortcut]), and pass it through a RELU activation
    X = Add()([X, X_shortcut])
    X = Activation('relu')(X)

    return X
from outputs import convolutional_block_output1, convolutional_block_output2
np.random.seed(1)
#X = np.random.randn(3, 4, 4, 6).astype(np.float32)
X1 = np.ones((1, 4, 4, 3)) * -1
X2 = np.ones((1, 4, 4, 3)) * 1
X3 = np.ones((1, 4, 4, 3)) * 3

X = np.concatenate((X1, X2, X3), axis = 0).astype(np.float32)

A = convolutional_block(X, f = 2, filters = [2, 4, 6], training=False)

assert type(A) == EagerTensor, "Use only tensorflow and keras functions"
assert tuple(tf.shape(A).numpy()) == (3, 2, 2, 6), "Wrong shape."
assert np.allclose(A.numpy(), convolutional_block_output1), "Wrong values when training=False."
print(A[0])

B = convolutional_block(X, f = 2, filters = [2, 4, 6], training=True)
assert np.allclose(B.numpy(), convolutional_block_output2), "Wrong values when training=True."

print('\033[92mAll tests passed!')
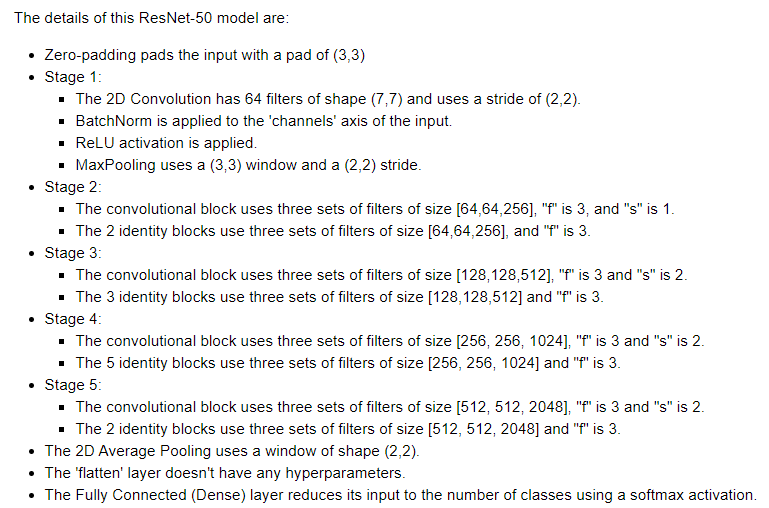
CHAPTER 4. 'Building Your First ResNet Model (50 layers)'
You now have the necessary blocks to build a very deep ResNet. The following figure describes in detail the architecture of this neural network. "ID BLOCK" in the diagram stands for "Identity block," and "ID BLOCK x3" means you should stack 3 identity blocks together.

□ ResNet50
# UNQ_C3
# GRADED FUNCTION: ResNet50

def ResNet50(input_shape = (64, 64, 3), classes = 6):
    """
    Stage-wise implementation of the architecture of the popular ResNet50:
    CONV2D -> BATCHNORM -> RELU -> MAXPOOL -> CONVBLOCK -> IDBLOCK*2 -> CONVBLOCK -> IDBLOCK*3
    -> CONVBLOCK -> IDBLOCK*5 -> CONVBLOCK -> IDBLOCK*2 -> AVGPOOL -> FLATTEN -> DENSE

    Arguments:
    input_shape -- shape of the images of the dataset
    classes -- integer, number of classes

    Returns:
    model -- a Model() instance in Keras
    """

    # Define the input as a tensor with shape input_shape
    X_input = Input(input_shape)


    # Zero-Padding
    X = ZeroPadding2D((3, 3))(X_input)

    # Stage 1
    X = Conv2D(64, (7, 7), strides = (2, 2), kernel_initializer = glorot_uniform(seed=0))(X)
    X = BatchNormalization(axis = 3)(X)
    X = Activation('relu')(X)
    X = MaxPooling2D((3, 3), strides=(2, 2))(X)

    # Stage 2
    X = convolutional_block(X, f = 3, filters = [64, 64, 256], s = 1)
    X = identity_block(X, 3, [64, 64, 256])
    X = identity_block(X, 3, [64, 64, 256])

    ### START CODE HERE

    ## Stage 3 (≈4 lines)
    X = convolutional_block(X, f = 3, filters = [128, 128, 512], s = 2)
    X = identity_block(X, 3, [128, 128, 512])
    X = identity_block(X, 3, [128, 128, 512])
    X = identity_block(X, 3, [128, 128, 512])

    ## Stage 4 (≈6 lines)
    X = convolutional_block(X, f = 3, filters = [256, 256, 1024], s = 2)
    X = identity_block(X, 3, [256, 256, 1024])
    X = identity_block(X, 3, [256, 256, 1024])
    X = identity_block(X, 3, [256, 256, 1024])
    X = identity_block(X, 3, [256, 256, 1024])
    X = identity_block(X, 3, [256, 256, 1024])

    ## Stage 5 (≈3 lines)
    X = convolutional_block(X, f = 3, filters = [512, 512, 2048], s = 2)
    X = identity_block(X, 3, [512, 512, 2048])
    X = identity_block(X, 3, [512, 512, 2048])

    ## AVGPOOL (≈1 line). Use "X = AveragePooling2D(...)(X)"
    X = AveragePooling2D(pool_size = (2, 2))(X)

    ### END CODE HERE

    # output layer
    X = Flatten()(X)
    X = Dense(classes, activation='softmax', kernel_initializer = glorot_uniform(seed=0))(X)


    # Create model
    model = Model(inputs = X_input, outputs = X)

    return model
model.compile(optimizer='adam', loss='categorical_crossentropy', metrics=['accuracy'])
The model is now ready to be trained. The only thing you need now is a dataset!
Let's load your old friend, the SIGNS dataset.

X_train_orig, Y_train_orig, X_test_orig, Y_test_orig, classes = load_dataset()

# Normalize image vectors
X_train = X_train_orig / 255.
X_test = X_test_orig / 255.

# Convert training and test labels to one hot matrices
Y_train = convert_to_one_hot(Y_train_orig, 6).T
Y_test = convert_to_one_hot(Y_test_orig, 6).T

print ("number of training examples = " + str(X_train.shape[0]))
print ("number of test examples = " + str(X_test.shape[0]))
print ("X_train shape: " + str(X_train.shape))
print ("Y_train shape: " + str(Y_train.shape))
print ("X_test shape: " + str(X_test.shape))
print ("Y_test shape: " + str(Y_test.shape))
Run the following cell to train your model on 10 epochs with a batch size of 32. On a GPU, it should take less than 2 minutes.
model.fit(X_train, Y_train, epochs = 10, batch_size = 32)
preds = model.evaluate(X_test, Y_test)
print ("Loss = " + str(preds[0]))
print ("Test Accuracy = " + str(preds[1]))
What you should remember:
- Very deep "plain" networks don't work in practice because vanishing gradients make them hard to train.
- Skip connections help address the Vanishing Gradient problem. They also make it easy for a ResNet block to learn an identity function.
- There are two main types of blocks: The identity block and the convolutional block.
- Very deep Residual Networks are built by stacking these blocks together.
■ 마무리
"Convolutional Neural Networks" (Andrew Ng)의 2주차 "Residual Networks" 실습에 대해서 정리해봤습니다.
그럼 오늘 하루도 즐거운 나날 되길 기도하겠습니다
좋아요와 댓글 부탁드립니다 :)
감사합니다.
'COURSERA' 카테고리의 다른 글
| week 3_Object Detection (Andrew Ng) (0) | 2022.03.13 |
|---|---|
| week 2_Transfer Learning with MobileNetV2 실습 (Andrew Ng) (0) | 2022.03.13 |
| week 2_Deep Convolutional Models 연습 문제 (Andrew Ng) (0) | 2022.03.13 |
| week 2_Deep Convolutional Models: Case Studies (Andrew Ng) (0) | 2022.03.13 |
| week 1_Convolutional Neural Networks: Application 실습 (Andrew Ng) (0) | 2022.03.13 |


댓글