
안녕하세요, HELLO
오늘은 DeepLearning.AI, Amazon Web Services에서 진행하는 Practical Data Science Specialization의 두 번째 과정인 "Build, Train, and Deploy ML Pipelines using BERT"을 정리하려고 합니다.
"Build, Train, and Deploy ML Pipelines using BERT"의 강의를 통해 'Automate a natural language processing task by building an end-to-end machine learning pipeline'에 대해서 배우게 됩니다. 강의는 아래와 같이 구성되어 있습니다.
~ Feature Engineering and Feature Store
~ Train, Debug and Profile a Machine Learning Model
~ Deploy End-to-End Machine Learning pipelines
"Build, Train, and Deploy ML Pipelines using BERT"의 1주 차 "Feature Engineering and Feature Store"의 실습 내용입니다.
In this lab you will start with the raw Women's Clothing Reviews dataset and prepare it to train a BERT-based natural language processing (NLP) model. The model will be used to classify customer reviews into positive (1), neutral (0) and negative (-1) sentiment.
You will convert the original review text into machine-readable features used by BERT. To perform the required feature transformation you will configure an Amazon SageMaker processing job, which will be running a custom Python script.
CHAPTER 1. Configure the SageMaker Feature Store'
CHAPTER 2. Transform the dataset'
CHAPTER '3. Query the Feature Store'
CHAPTER 1. Configure the SageMaker Feature Store'
# please ignore warning messages during the installation
!pip install --disable-pip-version-check -q sagemaker==2.35.0
!conda install -q -y pytorch==1.6.0 -c pytorch
!pip install --disable-pip-version-check -q transformers==3.5.1

# import library
import boto3
import sagemaker
import botocore

config = botocore.config.Config(user_agent_extra='dlai-pds/c2/w1')

# low-level service client of the boto3 session
sm = boto3.client(service_name='sagemaker',
                  config=config)

featurestore_runtime = boto3.client(service_name='sagemaker-featurestore-runtime',
                                    config=config)

sess = sagemaker.Session(sagemaker_client=sm,
                         sagemaker_featurestore_runtime_client=featurestore_runtime)

bucket = sess.default_bucket()
role = sagemaker.get_execution_role()
region = sess.boto_region_name
□ Configure dataset
The raw dataset is in the public S3 bucket. Let's start by specifying the S3 location of it, and List the files in the S3 bucket (in this case it will be just one file):
raw_input_data_s3_uri = 's3://dlai-practical-data-science/data/raw/'

!aws s3 ls $raw_input_data_s3_uri
□ Configure the SageMaker feature store
As the result of the transformation, in addition to generating files in S3 bucket, you will also save the transformed data in the Amazon SageMaker Feature Store to be used by others in your organization, for example.
To configure a Feature Store you need to setup a Feature Group. This is the main resource containing all of the metadata related to the data stored in the Feature Store. A Feature Group should contain a list of Feature Definitions. A Feature Definition consists of a name and the data type. The Feature Group also contains an online store configuration and an offline store configuration controlling where the data is stored. Enabling the online store allows quick access to the latest value for a record via the GetRecord API. The offline store allows storage of the data in your S3 bucket. You will be using the offline store in this lab.
Let's setup the Feature Group name and the Feature Store offline prefix in S3 bucket (you will use those later in the lab):
import time
timestamp = int(time.time())

feature_group_name = 'reviews-feature-group-' + str(timestamp)
feature_store_offline_prefix = 'reviews-feature-store-' + str(timestamp)
Taking two features from the original raw dataset (Review Text and Rating), you will transform it preparing to be used for the model training and then to be saved in the Feature Store. Here you will define the related features to be stored as a list of FeatureDefinition.
from sagemaker.feature_store.feature_definition import (
    FeatureDefinition,
    FeatureTypeEnum,
)

feature_definitions= [
    # unique ID of the review
    FeatureDefinition(feature_name='review_id', feature_type=FeatureTypeEnum.STRING),
    # ingestion timestamp
    FeatureDefinition(feature_name='date', feature_type=FeatureTypeEnum.STRING),
    # sentiment: -1 (negative), 0 (neutral) or 1 (positive). It will be found the Rating values (1, 2, 3, 4, 5)
    FeatureDefinition(feature_name='sentiment', feature_type=FeatureTypeEnum.STRING),
    # label ID of the target class (sentiment)
    FeatureDefinition(feature_name='label_id', feature_type=FeatureTypeEnum.STRING),
    # reviews encoded with the BERT tokenizer
    FeatureDefinition(feature_name='input_ids', feature_type=FeatureTypeEnum.STRING),
    # original Review Text
    FeatureDefinition(feature_name='review_body', feature_type=FeatureTypeEnum.STRING),
    # train/validation/test label
    FeatureDefinition(feature_name='split_type', feature_type=FeatureTypeEnum.STRING)
]
□ Exercise 1
Create the feature group using the feature definitions defined above.
Instructions: Use the FeatureGroup function passing the defined above feature group name and the feature definitions.
feature_group = FeatureGroup(
    name=..., # Feature Group name
    feature_definitions=..., # a list of Feature Definitions
    sagemaker_session=sess # SageMaker session
)
from sagemaker.feature_store.feature_group import FeatureGroup

feature_group = FeatureGroup(
    ### BEGIN SOLUTION - DO NOT delete this comment for grading purposes
    name=feature_group_name, # Replace None
    feature_definitions=feature_definitions, # Replace None
    ### END SOLUTION - DO NOT delete this comment for grading purposes
    sagemaker_session=sess
)

print(feature_group)
You will use the defined Feature Group later in this lab, the actual creation of the Feature Group will take place in the processing job. Now let's move into the setup of the processing job to transform the dataset.
CHAPTER 2. Transform the dataset'
You will configure a SageMaker processing job to run a custom Python script to balance and transform the raw data into a format used by BERT model.
Set the transformation parameters including the instance type, instance count, and train/validation/test split percentages. For the purposes of this lab, you will use a relatively small instance type. Please refer to this link for additional instance types that may work for your use case outside of this lab.
You can also choose whether you want to balance the dataset or not. In this case, you will balance the dataset to avoid class imbalance in the target variable, sentiment.
Another important parameter of the model is the max_seq_length, which specifies the maximum length of the classified reviews for the RoBERTa model. If the sentence is shorter than the maximum length parameter, it will be padded. In another case, when the sentence is longer, it will be truncated from the right side.
Since a smaller max_seq_length leads to faster training and lower resource utilization, you want to find the smallest power-of-2 that captures 100% of our reviews. For this dataset, the 100th percentile is 115. However, it's best to stick with powers-of-2 when using BERT. So let's choose 128 as this is the smallest power-of-2 greater than 115. You will see below how the shorter sentences will be padded to a maximum length.
mean        52.512374
std         31.387048
min          1.000000
10%         10.000000
20%         22.000000
30%         32.000000
40%         41.000000
50%         51.000000
60%         61.000000
70%         73.000000
80%         88.000000
90%         97.000000
100%       115.000000
max        115.000000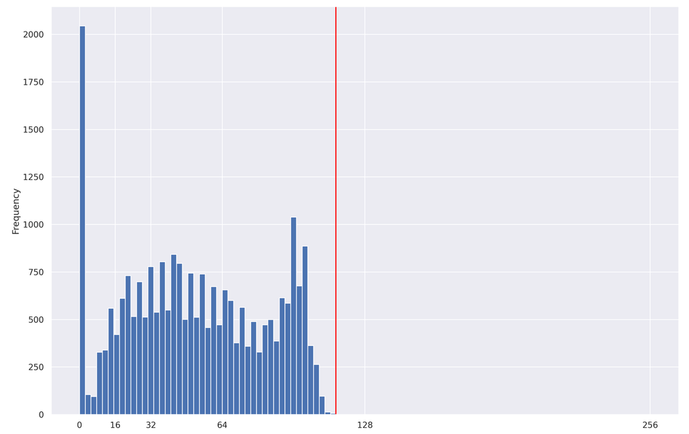
processing_instance_type='ml.c5.xlarge'
processing_instance_count=1
train_split_percentage=0.90
validation_split_percentage=0.05
test_split_percentage=0.05
balance_dataset=True
max_seq_length=128
To balance and transform our data, you will use a scikit-learn-based processing job. This is essentially a generic Python processing job with scikit-learn pre-installed. You can specify the version of scikit-learn you wish to use. Also pass the SageMaker execution role, processing instance type and instance count.
from sagemaker.sklearn.processing import SKLearnProcessor

processor = SKLearnProcessor(
    framework_version='0.23-1',
    role=role,
    instance_type=processing_instance_type,
    instance_count=processing_instance_count,
    env={'AWS_DEFAULT_REGION': region},
    max_runtime_in_seconds=7200
)
The processing job will be running the Python code from the file src/prepare_data.py. In the following exercise you will review the contents of the file and familiarize yourself with main parts of it.
□ Exercise 2
- Open the file src/prepare_data.py. Go through the comments to understand its content.
- Find and review the convert_to_bert_input_ids() function, which contains the RoBERTa tokenizer configuration.
- Complete method encode_plus of the RoBERTa tokenizer. Pass the max_seq_length as a value for the argument max_length. It defines a pad to a maximum length specified.
- Save the file src/prepare_data.py (with the menu command File -> Save Python File).
import sys, importlib
sys.path.append('src/')

# import the `prepare_data.py` module
import prepare_data

# reload the module if it has been previously loaded
if 'prepare_data' in sys.modules:
    importlib.reload(prepare_data)

input_ids = prepare_data.convert_to_bert_input_ids("this product is great!", max_seq_length)

updated_correctly = False

if len(input_ids) != max_seq_length:
    print('#######################################################################################################')
    print('Please check that the function \'convert_to_bert_input_ids\' in the file src/prepare_data.py is complete.')
    print('#######################################################################################################')
    raise Exception('Please check that the function \'convert_to_bert_input_ids\' in the file src/prepare_data.py is complete.')
else:
    print('##################')
    print('Updated correctly!')
    print('##################')

    updated_correctly = True
input_ids = prepare_data.convert_to_bert_input_ids("this product is great!", max_seq_length)
print(input_ids)
print('Length of the sequence: {}'.format(len(input_ids)))
'''
[0, 9226, 1152, 16, 372, 328, 2, 1, 1, 1, 1, 1, 1, 1, 1, 1, 1, 1, 1, 1, 1, 1, 1, 1, 1, 1, 1, 1, 1, 1, 1, 1, 1, 1, 1, 1, 1, 1, 1, 1, 1, 1, 1, 1, 1, 1, 1, 1, 1, 1, 1, 1, 1, 1, 1, 1, 1, 1, 1, 1, 1, 1, 1, 1, 1, 1, 1, 1, 1, 1, 1, 1, 1, 1, 1, 1, 1, 1, 1, 1, 1, 1, 1, 1, 1, 1, 1, 1, 1, 1, 1, 1, 1, 1, 1, 1, 1, 1, 1, 1, 1, 1, 1, 1, 1, 1, 1, 1, 1, 1, 1, 1, 1, 1, 1, 1, 1, 1, 1, 1, 1, 1, 1, 1, 1, 1, 1, 1]
Length of the sequence: 128
'''
Launch the processing job with the custom script passing defined above parameters.
from sagemaker.processing import ProcessingInput, ProcessingOutput

if (updated_correctly):

    processor.run(code='src/prepare_data.py',
              inputs=[
                    ProcessingInput(source=raw_input_data_s3_uri,
                                    destination='/opt/ml/processing/input/data/',
                                    s3_data_distribution_type='ShardedByS3Key')
              ],
              outputs=[
                    ProcessingOutput(output_name='sentiment-train',
                                     source='/opt/ml/processing/output/sentiment/train',
                                     s3_upload_mode='EndOfJob'),
                    ProcessingOutput(output_name='sentiment-validation',
                                     source='/opt/ml/processing/output/sentiment/validation',
                                     s3_upload_mode='EndOfJob'),
                    ProcessingOutput(output_name='sentiment-test',
                                     source='/opt/ml/processing/output/sentiment/test',
                                     s3_upload_mode='EndOfJob')
              ],
              arguments=['--train-split-percentage', str(train_split_percentage),
                         '--validation-split-percentage', str(validation_split_percentage),
                         '--test-split-percentage', str(test_split_percentage),
                         '--balance-dataset', str(balance_dataset),
                         '--max-seq-length', str(max_seq_length),
                         '--feature-store-offline-prefix', str(feature_store_offline_prefix),
                         '--feature-group-name', str(feature_group_name)
              ],
              logs=True,
              wait=False)

else:
    print('#######################################')
    print('Please update the code correctly above.')
    print('#######################################')
You can see the information about the processing jobs using the describe function. The result is in dictionary format. Let's pull the processing job name:
scikit_processing_job_name = processor.jobs[-1].describe()['ProcessingJobName']

print('Processing job name: {}'.format(scikit_processing_job_name))
# Processing job name: sagemaker-scikit-learn-2022-05-16-04-03-24-159
□ Exercise 3
Pull the processing job status from the processing job description.
Instructions: Print the keys of the processing job description dictionary, choose the one related to the status of the processing job and print the value of it.
print(processor.jobs[-1].describe().keys())

'''
dict_keys(['ProcessingInputs', 'ProcessingOutputConfig', 'ProcessingJobName', 'ProcessingResources',
'StoppingCondition', 'AppSpecification', 'Environment', 'RoleArn', 'ProcessingJobArn', 'ProcessingJobStatus', 'LastModifiedTime', 'CreationTime', 'ResponseMetadata'])
'''
### BEGIN SOLUTION - DO NOT delete this comment for grading purposes
scikit_processing_job_status = processor.jobs[-1].describe()['ProcessingJobStatus'] # Replace None
### END SOLUTION - DO NOT delete this comment for grading purposes
print('Processing job status: {}'.format(scikit_processing_job_status))
# Processing job status: InProgress
CHAPTER '3. Query the Feature Store'
In addition to transforming the data and saving in S3 bucket, the processing job populates the feature store with the transformed and balanced data. Let's query this data using Amazon Athena.
Use athena_query() function to create an Athena query for the defined above Feature Group. Then you can pull the table name of the Amazon Glue Data Catalog table which is auto-generated by Feature Store.
feature_store_query = feature_group.athena_query()

feature_store_table = feature_store_query.table_name

query_string = """
    SELECT date,
        review_id,
        sentiment,
        label_id,
        input_ids,
        review_body
    FROM "{}"
    WHERE split_type='train'
    LIMIT 5
""".format(feature_store_table)

print('Glue Catalog table name: {}'.format(feature_store_table))
print('Running query: {}'.format(query_string))
Configure the S3 location for the query results. This allows us to re-use the query results for future queries if the data has not changed. We can even share this S3 location between team members to improve query performance for common queries on data that does not change often.
output_s3_uri = 's3://{}/query_results/{}/'.format(bucket, feature_store_offline_prefix)
print(output_s3_uri)
□ Exercise 4
Query the feature store.
Instructions: Use feature_store_query.run function passing the constructed above query string and the location of the output S3 bucket.
feature_store_query.run(
    query_string=..., # query string
    output_location=... # location of the output S3 bucket
)
feature_store_query.run(
### BEGIN SOLUTION - DO NOT delete this comment for grading purposes
query_string=query_string, # Replace None
output_location=output_s3_uri # Replace None
### END SOLUTION - DO NOT delete this comment for grading purposes
)
feature_store_query.wait()import pandas as pd
pd.set_option("max_colwidth", 100)
df_feature_store = feature_store_query.as_dataframe()
df_feature_store
□ Export TSV from Feature Store
Save the output as a TSV file:
df_feature_store.to_csv('./feature_store_export.tsv',
                        sep='\t',
                        index=False,
                        header=True)
□ Check that the dataset in the Feature Store is balanced by sentiment
Now you can setup an Athena query to check that the stored dataset is balanced by the target class sentiment
□ Exercise 5
Write an SQL query to count the total number of the reviews per sentiment stored in the Feature Group.
Instructions: Pass the SQL statement of the form
SELECT category_column, COUNT(*) AS new_column_name
FROM table_name
GROUP BY category_column
into the variable query_string_count_by_sentiment. Here you would need to use the column sentiment and give a name count_reviews to the new column with the counts.
feature_store_query_2 = feature_group.athena_query()

# Replace all None
### BEGIN SOLUTION - DO NOT delete this comment for grading purposes
query_string_count_by_sentiment = """
SELECT sentiment, COUNT(*) AS count_reviews
FROM "{}"
GROUP BY sentiment
""".format(feature_store_table)
### END SOLUTION - DO NOT delete this comment for grading purposes
□ Exercise 6
Query the feature store.
Instructions: Use run function of the Feature Store query, passing the new query string query_string_count_by_sentiment. The output S3 bucket will remain unchanged. You can follow the example above.
feature_store_query_2.run(
    ### BEGIN SOLUTION - DO NOT delete this comment for grading purposes
    query_string=query_string_count_by_sentiment, # Replace None
    output_location=output_s3_uri # Replace None
    ### END SOLUTION - DO NOT delete this comment for grading purposes
)

feature_store_query_2.wait()

df_count_by_sentiment = feature_store_query_2.as_dataframe()
df_count_by_sentiment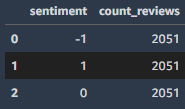
□ Exercise 7
Visualize the result of the query in the bar plot, showing the count of the reviews by sentiment value.
Instructions: Pass the resulting data frame df_count_by_sentiment into the barplot function of the seaborn library.
sns.barplot(
    data=...,
    x='...',
    y='...',
    color="blue"
)
import seaborn as sns
sns.barplot(
### BEGIN SOLUTION - DO NOT delete this comment for grading purposes
data=df_count_by_sentiment, # Replace None
x='sentiment', # Replace None
y='count_reviews', # Replace None
### END SOLUTION - DO NOT delete this comment for grading purposes
color="blue"
)■ 마무리
"Build, Train, and Deploy ML Pipelines using BERT"의 1주 차 "Feature Engineering and Feature Store"의 실습에 대해서 정리해봤습니다.
그럼 오늘 하루도 즐거운 나날 되길 기도하겠습니다
좋아요와 댓글 부탁드립니다 :)
감사합니다.
'COURSERA' 카테고리의 다른 글
| week 2_Train, Debug and Profile a Machine Learning Model 연습 문제 (0) | 2022.08.21 |
|---|---|
| week 2_Train, Debug and Profile a Machine Learning Model (0) | 2022.08.21 |
| [COURSERA] Analyze Datasets and Train ML Models using AutoML 자격증 취득 (0) | 2022.07.10 |
| week 4_Train a text classifier using Amazon SageMaker BlazingText built-in algorithm 실습 (0) | 2022.07.10 |
| week 4_Built-in algorithms 연습 문제 (1) | 2022.07.10 |


댓글