
안녕하세요, HELLO
오늘은 DeepLearning.AI, Amazon Web Services에서 진행하는 Practical Data Science Specialization의 첫 번째 과정인 "Analyze Datasets and Train ML Models using AutoML"을 정리하려고 합니다.
"Analyze Datasets and Train ML Models using AutoML"의 강의를 통해 'exploratory data analysis (EDA), automated machine learning (AutoML), and text classification algorithms에 대해서 배우게 됩니다. 강의는 아래와 같이 구성되어 있습니다.
~ Explore the Use Case and Analyze the Dataset
~ Data Bias and Feature Importance
~ Use Automated Machine Learning to train a Text Classifier
~ Built-in algorithms
"Analyze Datasets and Train ML Models using AutoML"의 2주차 "Detect data bias with Amazon Sagemaker Clarify" 실습 내용입니다.
■ Introduction
Bias can be present in your data before any model training occurs. Inspecting the dataset for bias can help detect collection gaps, inform your feature engineering, and understand societal biases the dataset may reflect. In this lab you will analyze bias on the dataset, generate and analyze bias report, and prepare the dataset for the model training.
CHAPTER 1. 'Analyze the dataset'
CHAPTER 2. 'Analyze class imbalance on the dataset with Amazon SageMaker Clarify'
CHAPTER 3. 'Balance the dataset by product_category and sentiment'
CHAPTER 4. 'Analyze bias on balanced dataset with Amazon SageMaker Clarify'
First, let's install and import required modules.
# please ignore warning messages during the installation
!pip install --disable-pip-version-check -q sagemaker==2.35.0
import boto3
import sagemaker
import pandas as pd
import numpy as np
import botocore
config = botocore.config.Config(user_agent_extra='dlai-pds/c1/w2')
# low-level service client of the boto3 session
sm = boto3.client(service_name='sagemaker',
config=config)
sess = sagemaker.Session(sagemaker_client=sm)
bucket = sess.default_bucket()
role = sagemaker.get_execution_role()
region = sess.boto_region_nameimport matplotlib.pyplot as plt
%matplotlib inline
%config InlineBackend.figure_format='retina'CHAPTER 1. 'Analyze the dataset'
□ Create a pandas data frame from the CSV file
Create a pandas dataframe from each of the product categories and concatenate them into one.
!aws s3 cp 's3://dlai-practical-data-science/data/transformed/womens_clothing_ecommerce_reviews_transformed.csv' ./
path = './womens_clothing_ecommerce_reviews_transformed.csv'

df = pd.read_csv(path)
df.head()
As you saw in the previous lab, there are way more positive reviews than negative or neutral. Such a dataset is called unbalanced.
In this case, using a relatively small data subset you could visualize the occurring unbalances. At scale, you would need to perform bias analysis. Let's use this dataset as an example.
□ Upload the dataset to S3 bucket
Upload the dataset to a private S3 bucket in a folder called bias/unbalanced.
data_s3_uri_unbalanced = sess.upload_data(bucket=bucket,
                               key_prefix='bias/unbalanced',
                               path='./womens_clothing_ecommerce_reviews_transformed.csv')
data_s3_uri_unbalanced

# 's3://sagemaker-us-east-1-154207171591/bias/unbalanced/womens_clothing_ecommerce_reviews_transformed.csv'
You can review the uploaded CSV file in the S3 bucket.
Instructions:
- open the link (실습에서는 HTML display로 링크를 통해 확인할 수 있습니다)
- click on the S3 bucket name sagemaker-us-east-1-ACCOUNT
- go to the folder bias/unbalanced
- check the existence of the file womens_clothing_ecommerce_reviews_transformed.csv
CHAPTER 2. 'Analyze class imbalance on the dataset with Amazon SageMaker Clarify'
□ Configure a DataConfig
Information about the input data needs to be provided to the processor. This can be done with the DataConfig of the Clarify container. It stores information about the dataset to be analyzed, for example the dataset file, its format, headers and labels.
■ Exercise 1
Configure a DataConfig for Clarify.
Instructions: Use DataConfig to configure the target column ('sentiment' label), data input (data_s3_uri_unbalanced) and output paths (bias_report_unbalanced_output_path) with their formats (header names and the dataset type):
data_config_unbalanced = clarify.DataConfig(
    s3_data_input_path=..., # S3 object path containing the unbalanced dataset
    s3_output_path=..., # path to store the output
    label='...', # target column
    headers=df_unbalanced.columns.to_list(),
    dataset_type='text/csv'
)
from sagemaker import clarify
bias_report_unbalanced_output_path = 's3://{}/bias/generated_bias_report/unbalanced'.format(bucket)
data_config_unbalanced = clarify.DataConfig(
### BEGIN SOLUTION - DO NOT delete this comment for grading purposes
s3_data_input_path=data_s3_uri_unbalanced, # Replace None
s3_output_path=bias_report_unbalanced_output_path, # Replace None
label='sentiment', # Replace None
### END SOLUTION - DO NOT delete this comment for grading purposes
headers=df.columns.to_list(),
dataset_type='text/csv'
)□ Configure BiasConfig
Bias is measured by calculating a metric and comparing it across groups. To compute it, you will specify the required information in the BiasConfig API. SageMaker Clarify needs the sensitive columns (facet_name) and the desirable outcomes (label_values_or_threshold). Here product_category is the sensitive facet and the desired outcome is with the sentiment==1.
SageMaker Clarify can handle both categorical and continuous data for label_values_or_threshold. In this case you are using categorical data.
bias_config_unbalanced = clarify.BiasConfig(
    label_values_or_threshold=[1], # desired sentiment
    facet_name='product_category' # sensitive column (facet)
)
□ Configure Amazon SageMaker Clarify as a processing job
Now you need to construct an object called SageMakerClarifyProcessor. This allows you to scale the process of data bias detection using two parameters, instance_count and instance_type. Instance_count represents how many nodes you want in the distributor cluster during the data detection. Instance_type specifies the processing capability (compute capacity, memory capacity) available for each one of those nodes. For the purposes of this lab, you will use a relatively small instance type. Please refer to this link for additional instance types that may work for your use case outside of this lab.
clarify_processor_unbalanced = clarify.SageMakerClarifyProcessor(role=role,
                                                      instance_count=1,
                                                      instance_type='ml.m5.large',
                                                      sagemaker_session=sess)
□ Run the Amazon SageMaker Clarify processing job
■ Exercise 2
Run the configured processing job to compute the requested bias methods of the input data
Instructions: Apply the run_pre_training_bias method to the configured Clarify processor, passing the configured input/output data (data_config_unbalanced), configuration of sensitive groups (bias_config_unbalanced) with the other job setup parameters:
clarify_processor_unbalanced.run_pre_training_bias(
    data_config=..., # configured input/output data
    data_bias_config=..., # configured sensitive groups
    methods=["CI", "DPL", "KL", "JS", "LP", "TVD", "KS"], # selector of a subset of potential metrics
    wait=False, # whether the call should wait until the job completes (default: True)
    logs=False # whether to show the logs produced by the job. Only meaningful when wait is True (default: True)
)
clarify_processor_unbalanced.run_pre_training_bias(
### BEGIN SOLUTION - DO NOT delete this comment for grading purposes
data_config=data_config_unbalanced, # Replace None
data_bias_config=bias_config_unbalanced, # Replace None
### END SOLUTION - DO NOT delete this comment for grading purposes
methods=["CI", "DPL", "KL", "JS", "LP", "TVD", "KS"],
wait=False,
logs=False
)□ Run and review the Amazon SageMaker Clarify processing job on the unbalanced dataset
Review the created Amazon SageMaker Clarify processing job and the Cloud Watch logs.
Instructions:
- open the link (실습에서는 HTML display로 링크를 통해 확인할 수 있습니다)
- note that you are in the section Amazon SageMaker -> Processing jobs
- check the processing job name
- note which other properties of the processing job you can see in the console
Instructions:
- open the link (실습에서는 HTML display로 링크를 통해 확인할 수 있습니다)
- open the log stream with the name, which starts from the processing job name
- have a quick look at the log messages
running_processor = sagemaker.processing.ProcessingJob.from_processing_name(processing_job_name=run_unbalanced_bias_processing_job_name,
                                                                            sagemaker_session=sess)
This cell will take approximately 5-10 minutes to run.
%%time

running_processor.wait(logs=False)
□ Analyze unbalanced bias report
In this run, you analyzed bias for sentiment relative to the product_category for the unbalanced data. Let's have a look at the bias report.
# List the files in the output path bias_report_unbalanced_output_path:
!aws s3 ls $bias_report_unbalanced_output_path/
# Download generated bias report from S3 bucket:
!aws s3 cp --recursive $bias_report_unbalanced_output_path ./generated_bias_report/unbalanced/
The bias report shows a number of metrics, but here you can focus on just two of them:
- Class Imbalance (CI). Measures the imbalance in the number of members between different facet values. Answers the question, does a product_category have disproportionately more reviews than others? Values of CI will become equal for even distribution between facets. Here, different CI values show the existence of imbalance.
- Difference in Positive Proportions in Labels (DPL). Measures the imbalance of positive outcomes between different facet values. Answers the question, does a product_category have disproportionately higher ratings than others? With the range over the interval from -1 to 1, if there is no bias, you want to see this value as close as possible to zero. Here, non-zero values indicate the imbalances.
CHAPTER 3. 'Balance the dataset by product_category and sentiment'
Let's balance the dataset by product_category and sentiment. Then you can configure and run SageMaker Clarify processing job to analyze the bias of it. Which metrics values do you expect to see in the bias report?
df_grouped_by = df.groupby(['product_category', 'sentiment'])
df_balanced = df_grouped_by.apply(lambda x: x.sample(df_grouped_by.size().min()).reset_index(drop=True))
df_balanced
□ Visualize the distribution of review sentiment in the balanced dataset.
import seaborn as sns

sns.countplot(data=df_balanced, x='sentiment', hue='product_category')

plt.legend(loc='upper right',bbox_to_anchor=(1.3, 1.1))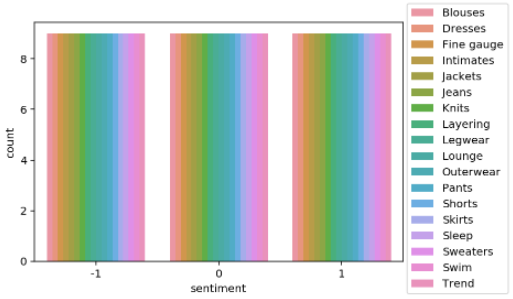
CHAPTER 4. 'Analyze bias on balanced dataset with Amazon SageMaker Clarify'
□ Exercise 3
Configure a DataConfig for Clarify to analyze bias on the balanced dataset.
Instructions: Pass the S3 object path containing the balanced dataset, the path to store the output (bias_report_balanced_output_path) and the target column. You can use exercise 1 as an example.
from sagemaker import clarify

bias_report_balanced_output_path = 's3://{}/bias/generated_bias_report/balanced'.format(bucket)

data_config_balanced = clarify.DataConfig(
    ### BEGIN SOLUTION - DO NOT delete this comment for grading purposes
    s3_data_input_path=data_s3_uri_unbalanced, # Replace None
    s3_output_path=bias_report_balanced_output_path, # Replace None
    label='sentiment', # Replace None
    ### END SOLUTION - DO NOT delete this comment for grading purposes
    headers=df_balanced.columns.to_list(),
    dataset_type='text/csv'
)
□ Configure BiasConfig
BiasConfig for the balanced dataset will have the same settings as before.
bias_config_balanced = clarify.BiasConfig(
    label_values_or_threshold=[1], # desired sentiment
    facet_name='product_category' # sensitive column (facet)
)
□ Configure SageMaker Clarify as a processing job
SageMakerClarifyProcessor object will also have the same parameters.
clarify_processor_balanced = clarify.SageMakerClarifyProcessor(role=role,
                                                      instance_count=1,
                                                      instance_type='ml.m5.large',
                                                      sagemaker_session=sess)
□ Run the Amazon SageMaker Clarify processing job
■ Exercise 4
Run the configured processing job for the balanced dataset.
Instructions: Apply the run_pre_training_bias method to the configured Clarify processor, passing the input/output data, configuration of sensitive groups with the other job setup parameters. You can use exercise 2 as an example.
clarify_processor_balanced.run_pre_training_bias(
    ### BEGIN SOLUTION - DO NOT delete this comment for grading purposes
    data_config=data_config_balanced, # Replace None
    data_bias_config=bias_config_balanced, # Replace None
    ### END SOLUTION - DO NOT delete this comment for grading purposes
    methods=["CI", "DPL", "KL", "JS", "LP", "TVD", "KS"],
    wait=False,
    logs=False
)
□ Run and review the Clarify processing job on the balanced dataset
running_processor = sagemaker.processing.ProcessingJob.from_processing_name(processing_job_name=run_balanced_bias_processing_job_name,
                                                                            sagemaker_session=sess)
This cell will take approximately 5-10 minutes to run.
%%time

running_processor.wait(logs=False)
□ Analyze balanced bias report
#List the files in the output path bias_report_balanced_output_path:

!aws s3 ls $bias_report_balanced_output_path/

#Download generated bias report from S3 bucket:

!aws s3 cp --recursive $bias_report_balanced_output_path ./generated_bias_report/balanced/
Review the downloaded bias report (in HTML format):
from IPython.core.display import display, HTML

display(HTML('<b>Review <a target="blank" href="./generated_bias_report/balanced/report.html">balanced bias report</a></b>'))
In this run, you analyzed bias for sentiment relative to the product_category for the balanced data. Note that the Class Imbalance (CI) metric is equal across all product categories for the target label, sentiment. And Difference in Positive Proportions in Labels (DPL) metric values are zero.
■ 마무리
"Analyze Datasets and Train ML Models using AutoML"의 2주차 "Detect data bias with Amazon Sagemaker Clarify" 실습에 대해서 정리해봤습니다.
그럼 오늘 하루도 즐거운 나날 되길 기도하겠습니다
좋아요와 댓글 부탁드립니다 :)
감사합니다.
'COURSERA' 카테고리의 다른 글
| week 3_Use Automated Machine Learning to train a Text Classifier 연습 문제 (0) | 2022.07.10 |
|---|---|
| week 3_Use Automated Machine Learning to train a Text Classifier (0) | 2022.07.10 |
| week 2_Data Bias and Feature Importance 연습 문제 (0) | 2022.07.10 |
| week 2_Data Bias and Feature Importance (0) | 2022.07.10 |
| week 1_Feature Engineering and Feature Store 연습 문제 (0) | 2022.07.10 |


댓글